Azure SSO Configuration
Azure SSO Configuration
PGP Single Sign-On (SSO) with Azure
The Praetorian Guard Platform (PGP) offers Single Sign-On integration with Azure to streamline user access management. This guide will walk you through the complete setup process, which requires configuring both your Azure environment and PGP. Before beginning the integration, you'll need to gather three essential pieces of information
Client ID
Client Secret
Issuer URL
Domain Verification
The first step is to verify ownership of your domain by adding a DNS TXT record. Access your domain's DNS settings or management interface where you'll need to add a TXT record. The record should follow the format "chariot=<verification-id>", where <verification-id> is the unique verification ID assigned to your account. You can find this value in the SSO setup dialog on the Organization Settings tab on the settings page, where it is available to copy and paste.
At your DNS management interface, set the text record for your root domain. For example, if your domain is YourDomain.com and your record is set at the root level (@), you would add a TXT record with the value shown in the SSO setup dialog. Within the PGP setup pop-up, you can copy and paste this value.
Once set, your DNS TXT record might look something like this:
To verify that your record has been published, you can run the command dig +short TXT YourDomain.com if on a Mac or nslookup -type=TXT YourDomain.com if using Windows, and look for your record in the output.
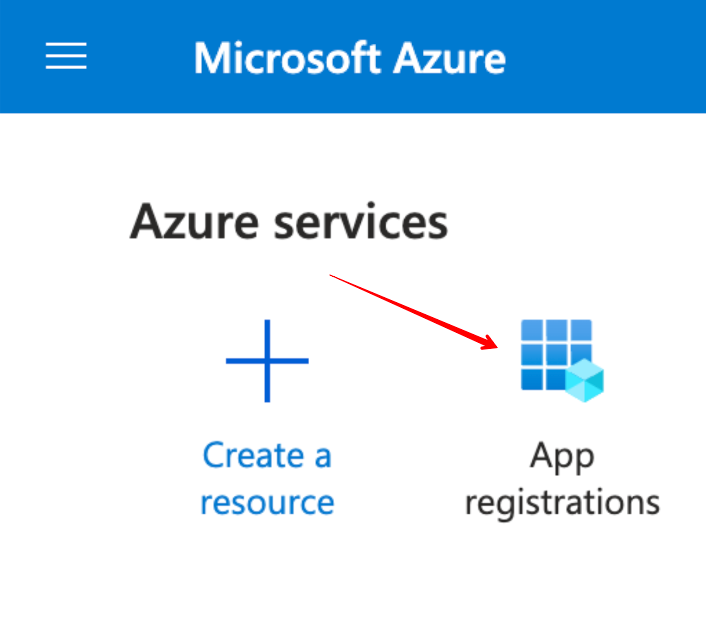
Creating the Azure Application Registration
Start by visiting the Azure Portal and creating a new Single Tenant App Registration.
On the App registrations page, follow these steps:
Supply the name of the application to Azure, such as "PGP SSO".
Make and implement decisions on who will be able to access PGP SSO through Azure.
Configure a "Web" Redirect URI with this URI:
https://sso.guard.praetorian.com/oauth2/idpresponse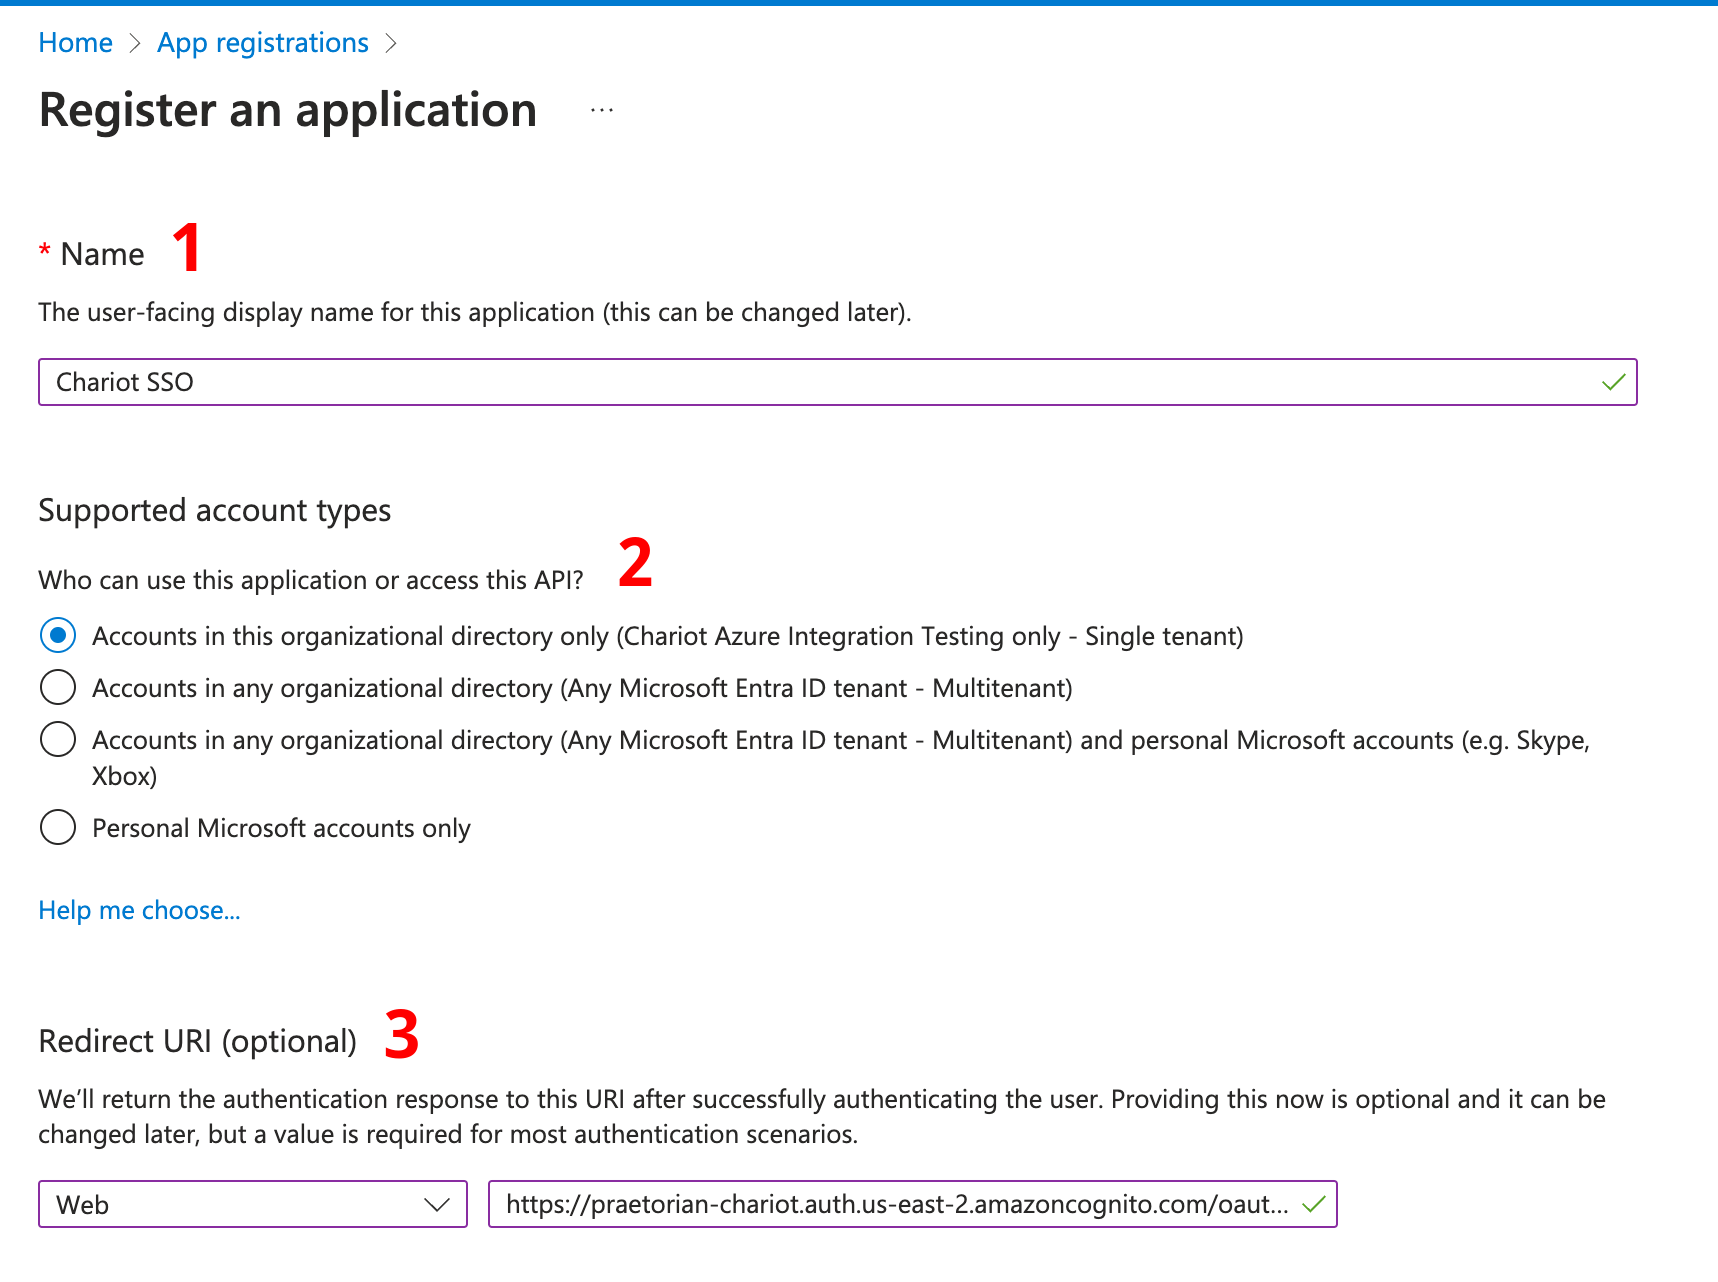
Generate the Client Secret and Application ID
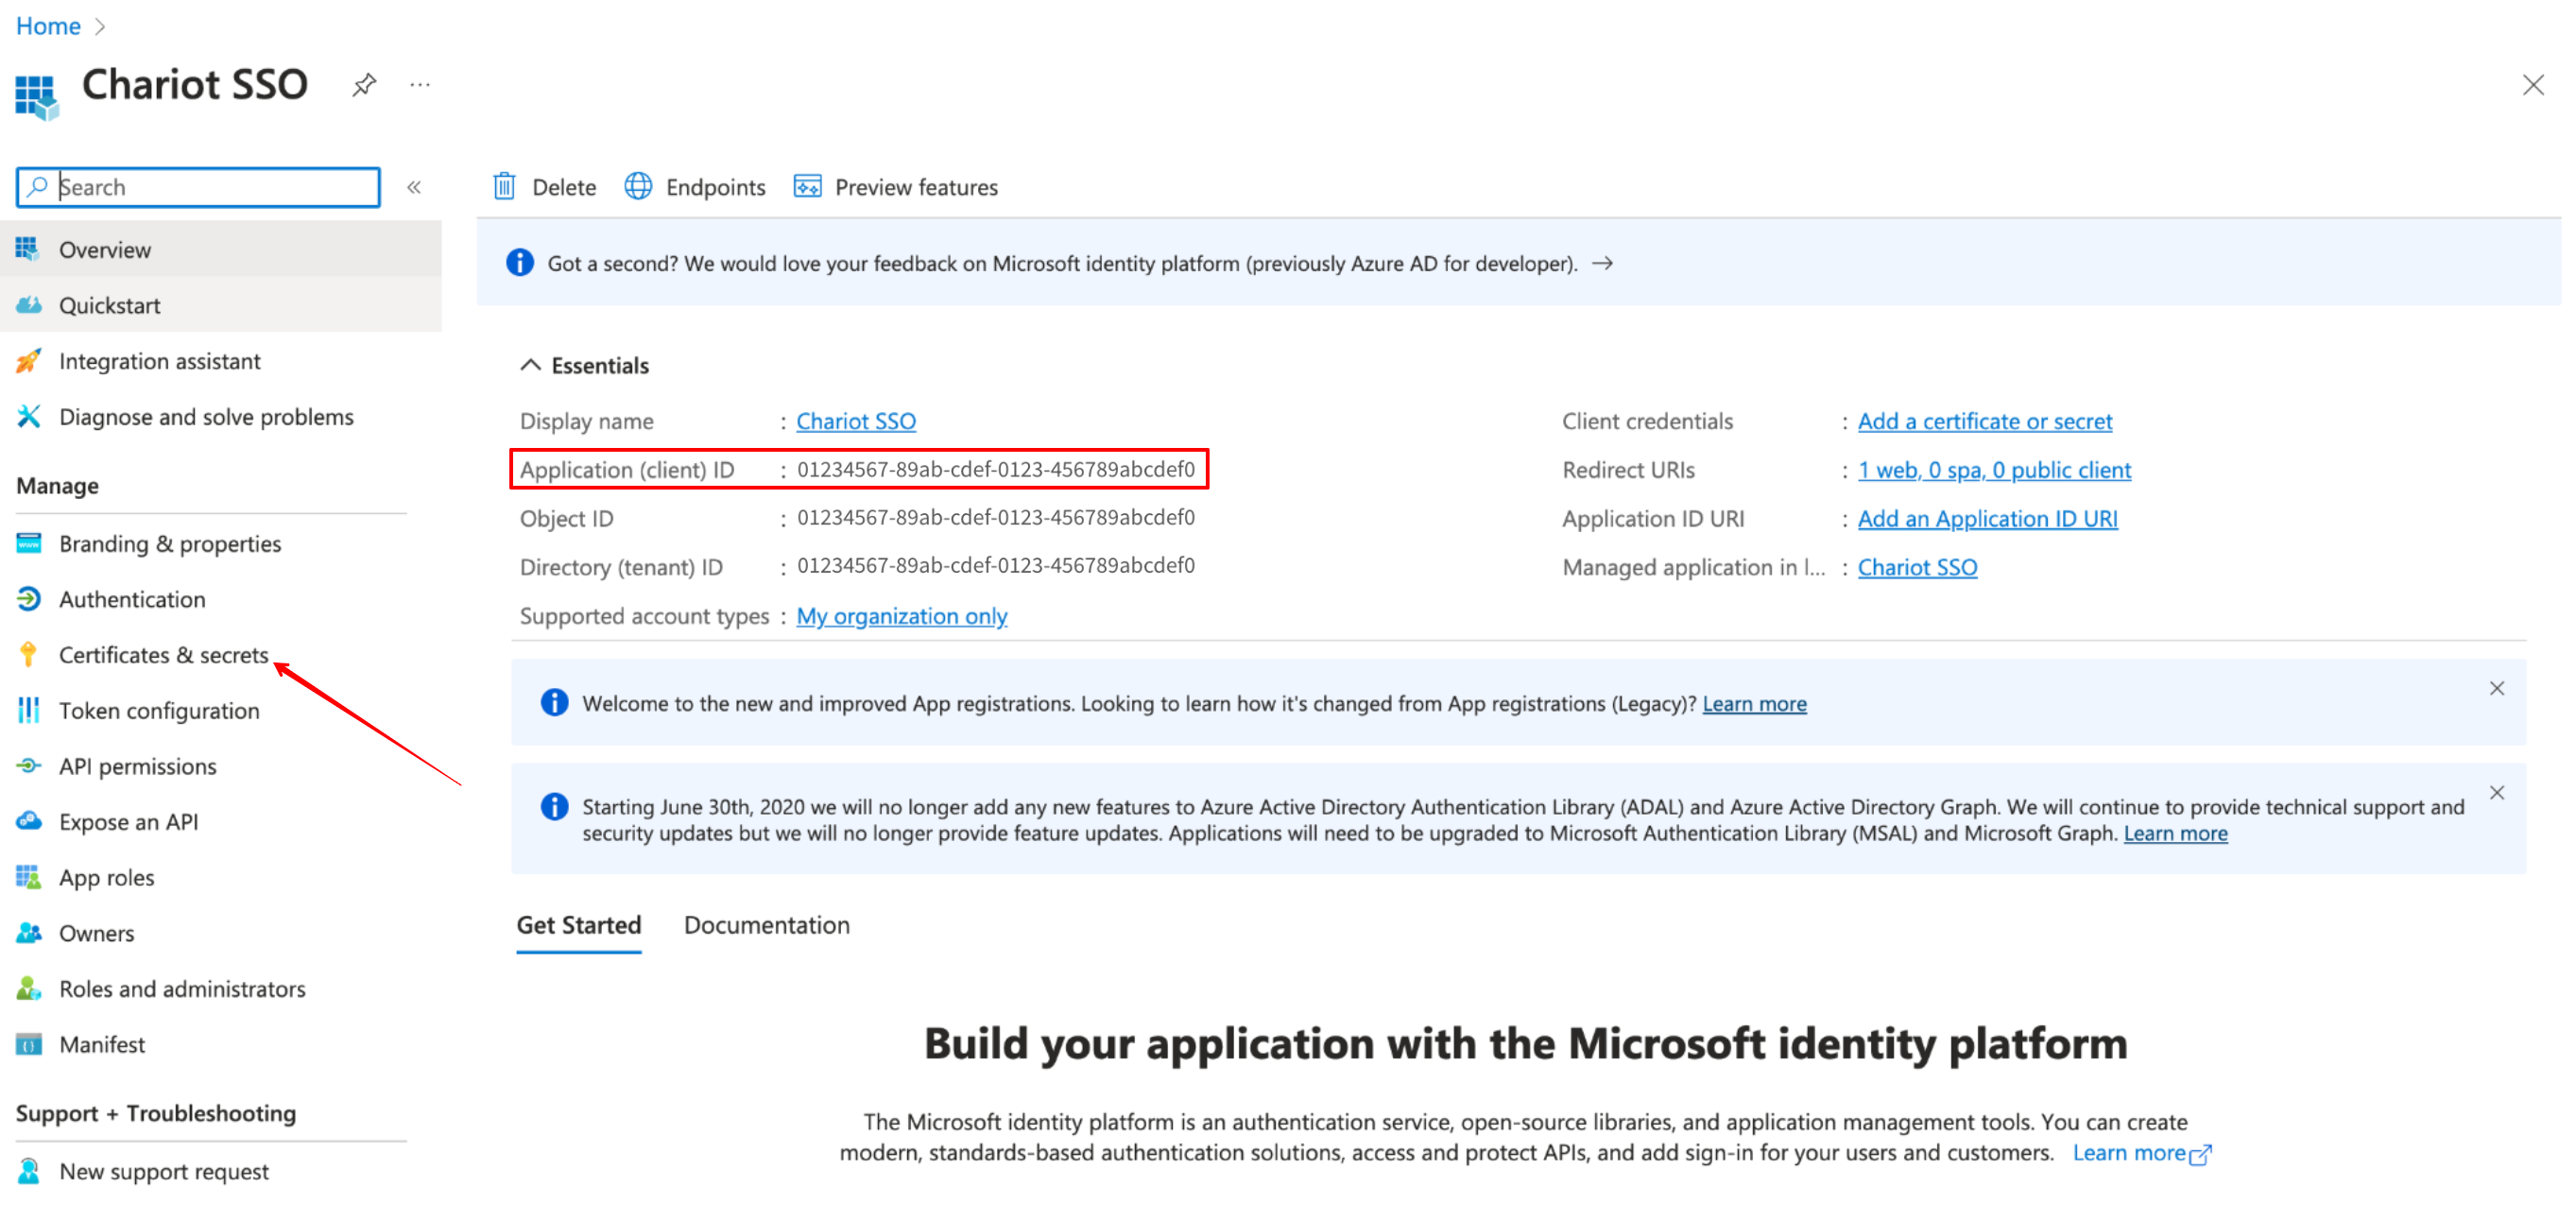
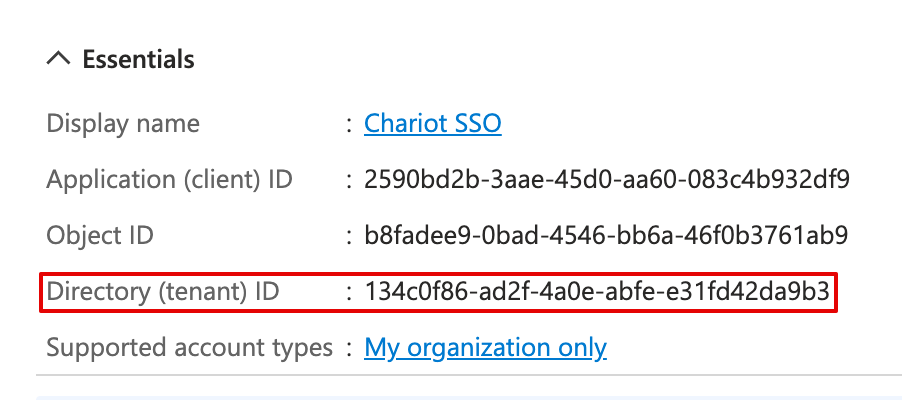
Navigate to the newly created application Overview. Note the Application (client) ID and Directory (tenant) ID on the overview page. Copy these. The Application (client) ID will be used as the Client ID and the Directory (tenant) ID will be used in the Issuer URL in the PGP application.
Click on Certificates and Secrets on the menu to the left.
On the Certificates and secrets page, click to add a New client secret. Generate a new client secret, and copy the value. Once you create the New client secret this value will not be visible again.
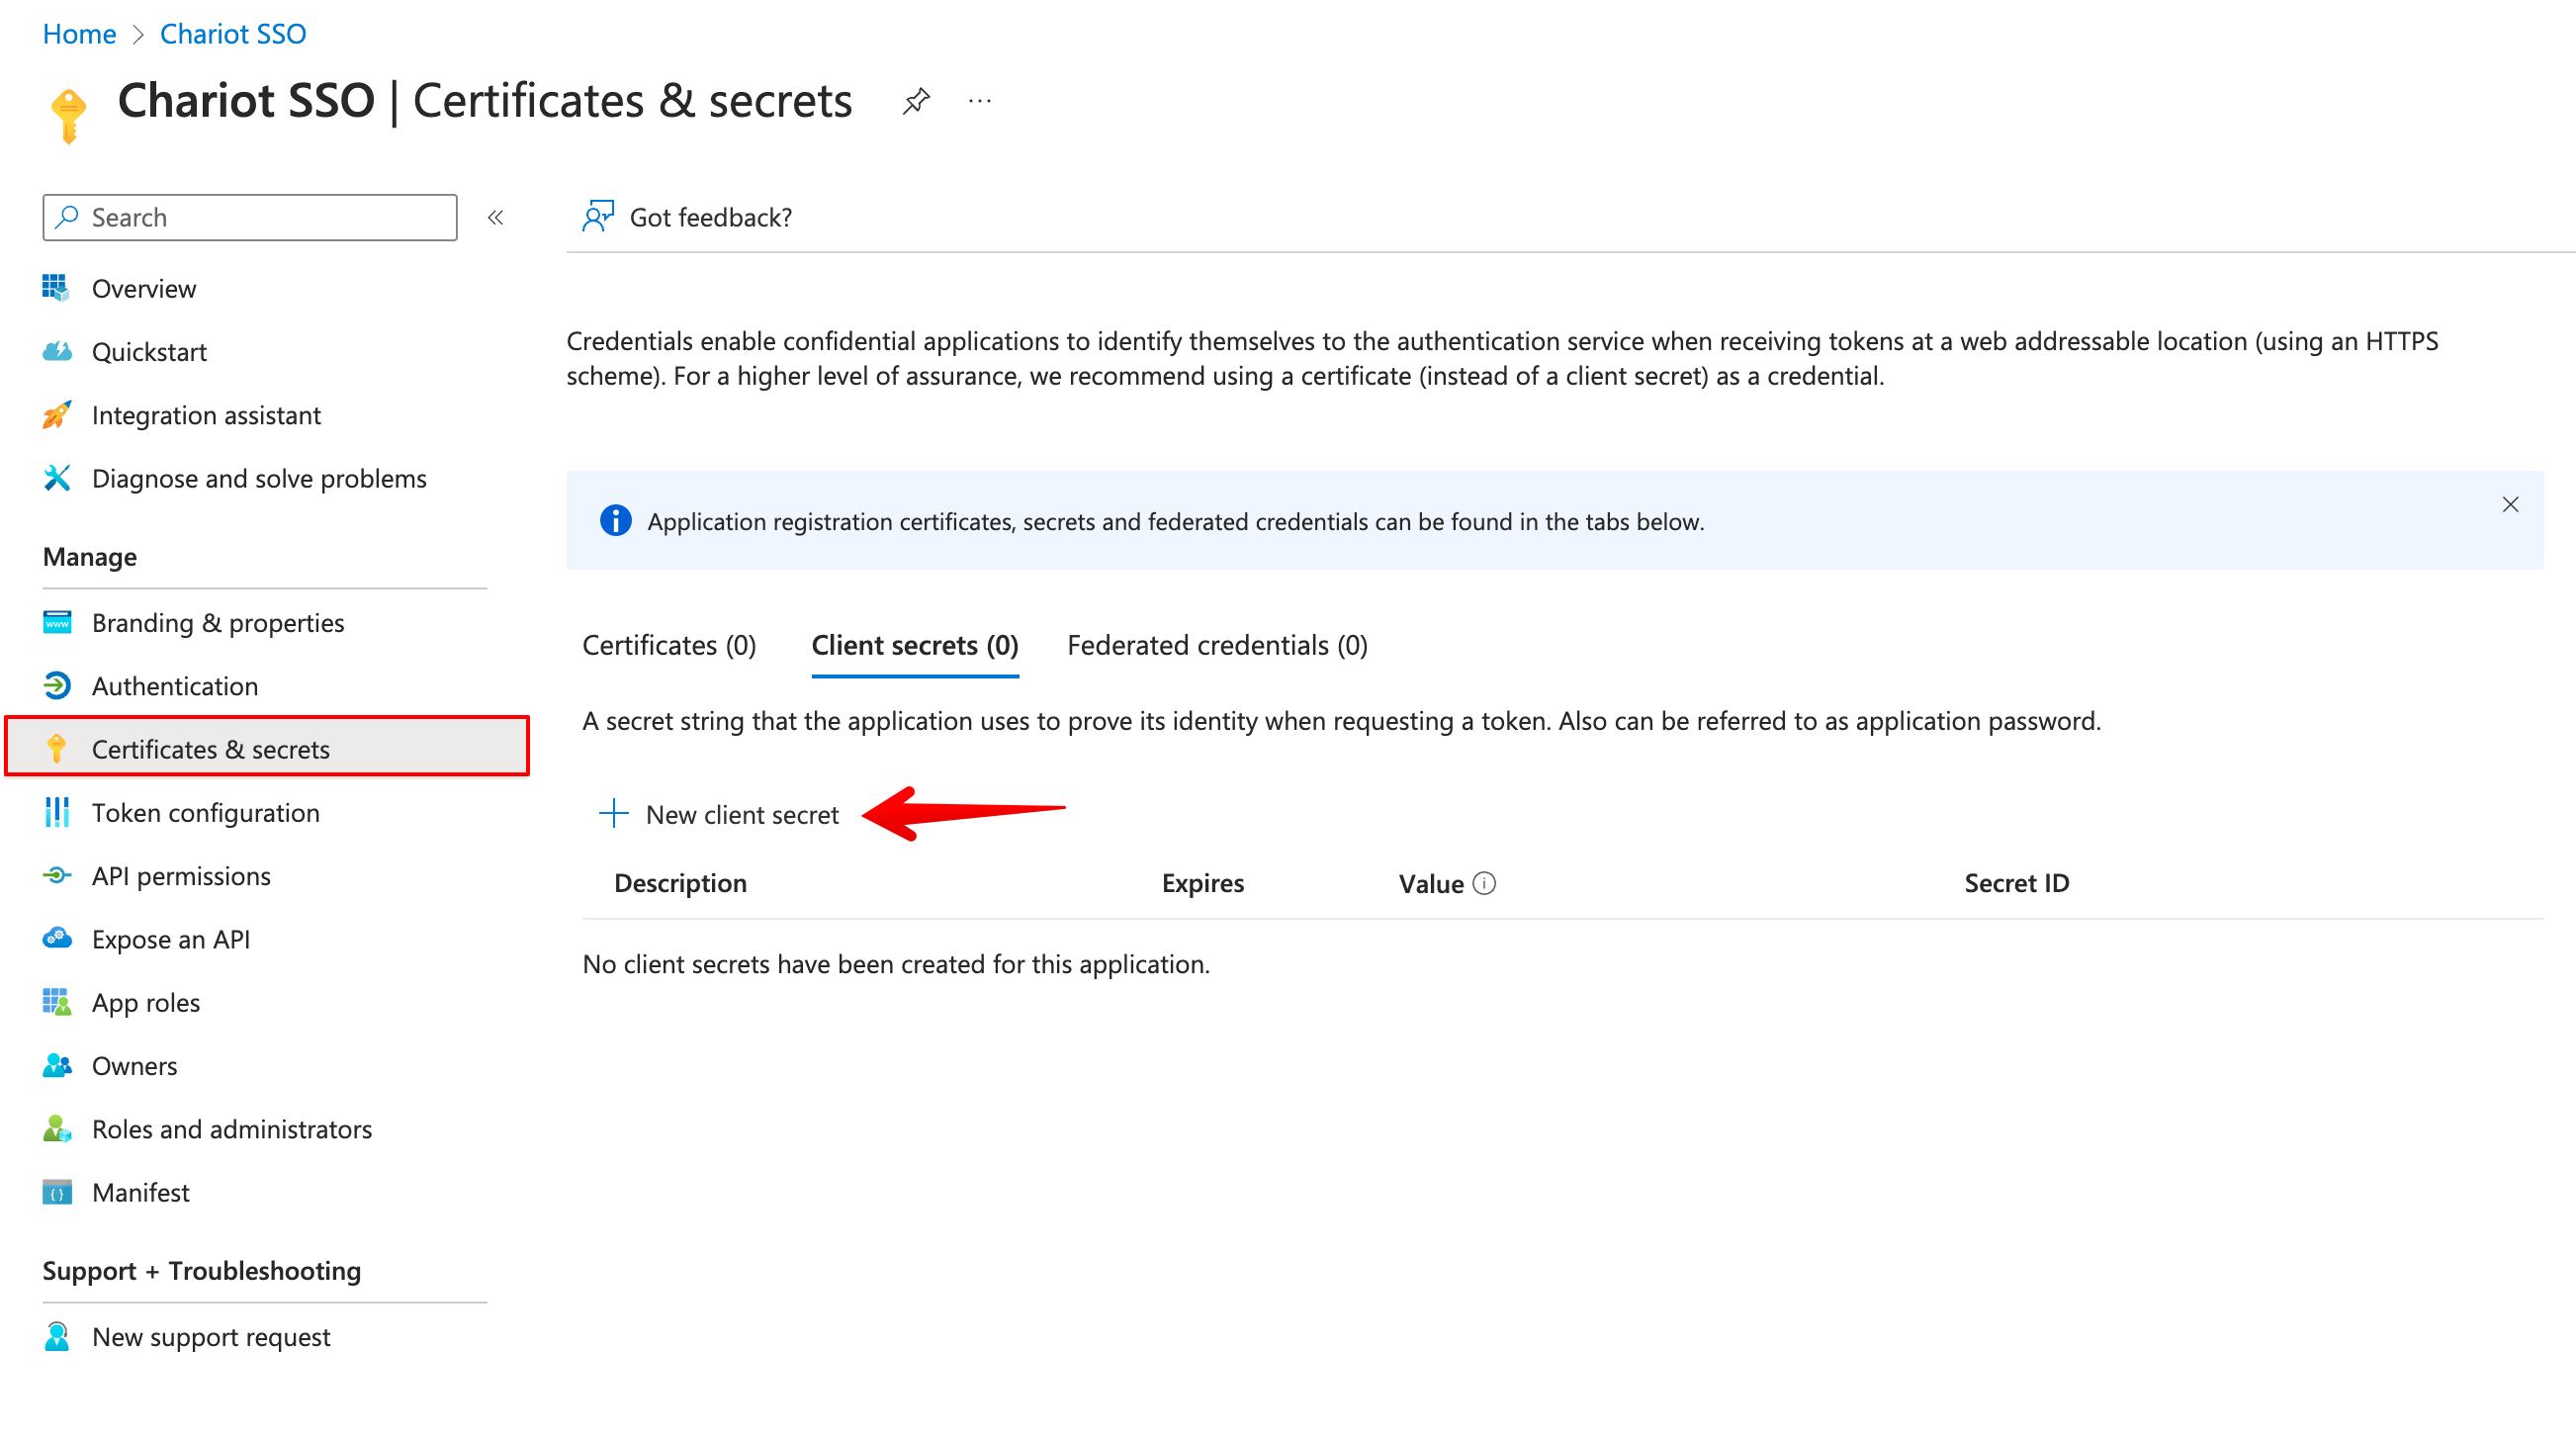
The newly generated secret value will show up in the table below Description. Again, remember to copy the secret value as you will need for PGP SSO Setup as the Secret. The Secret ID (separate from the Application (client) ID, above) should not be needed for the PGP - Azure integration.

Get the issuer URL
Your issuer URL will be:
https://login.microsoftonline.com/<tenant-id>/v2.0...where is the Directory (tenant) ID listed on the application overview page.
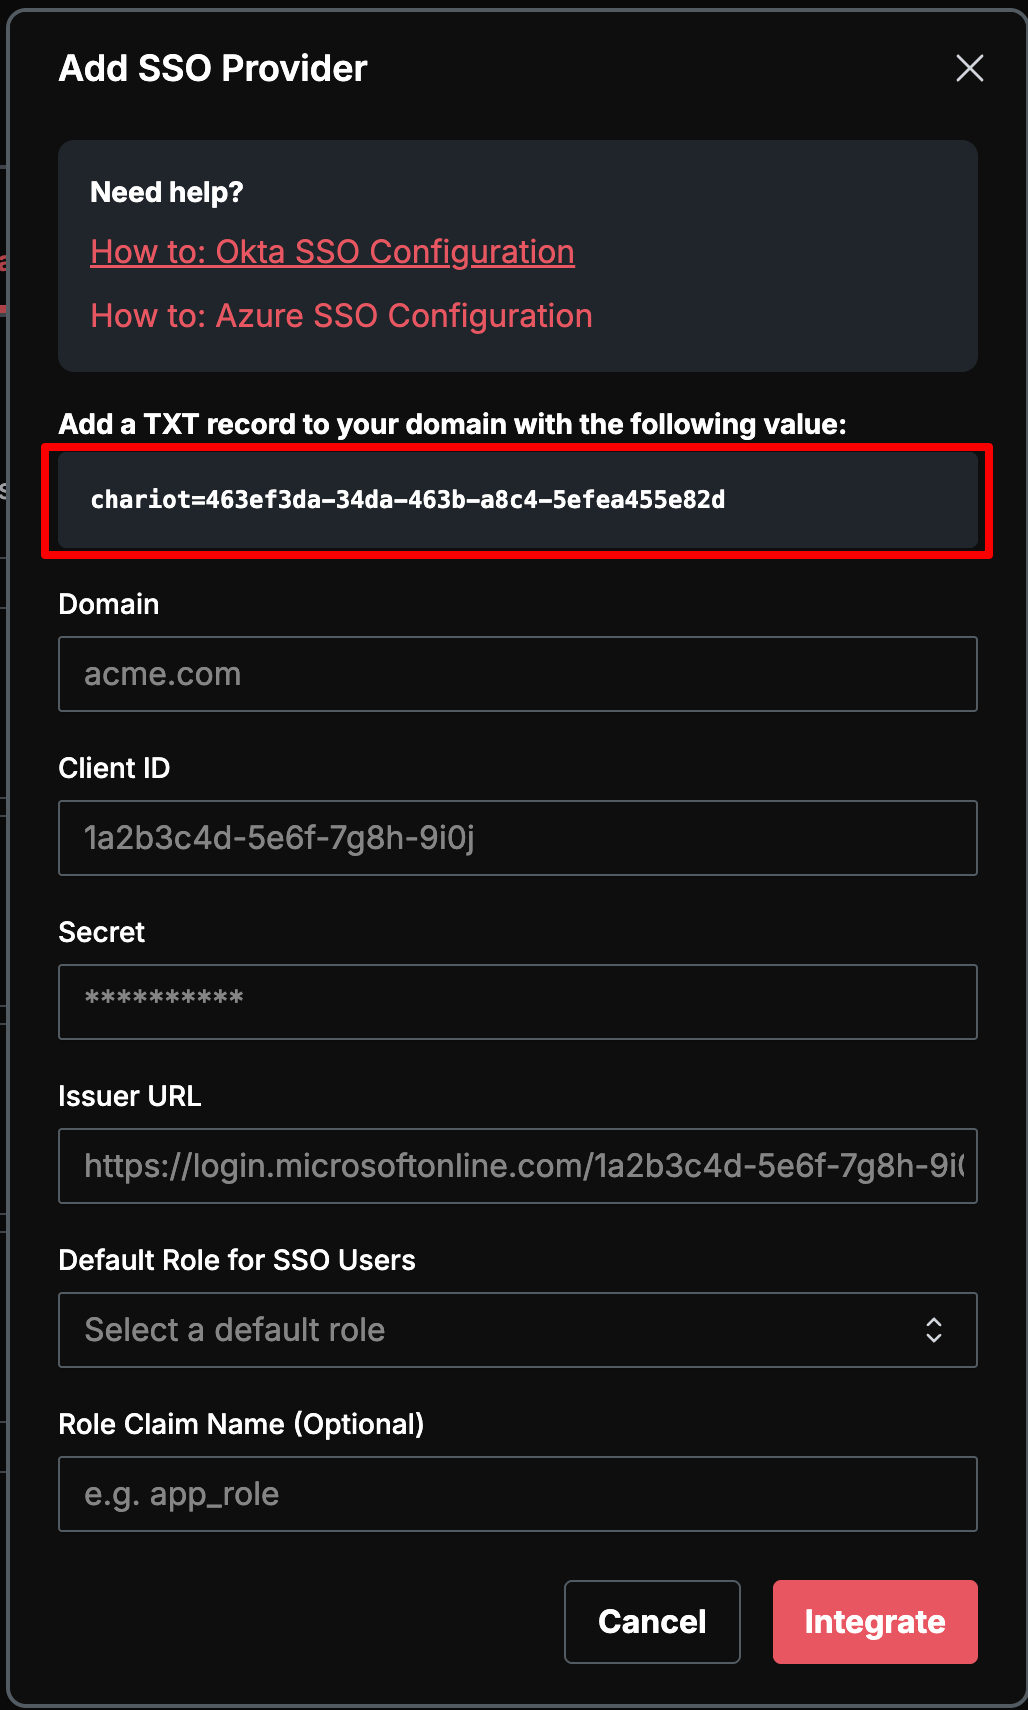
PGP Integration Configuration
To complete the integration, log into PGP with your existing credentials. Click Settings on the bottom left menu then the Organization Settings tab. Look for the Single Sign-On +Add Provider button.

Provide the following information:
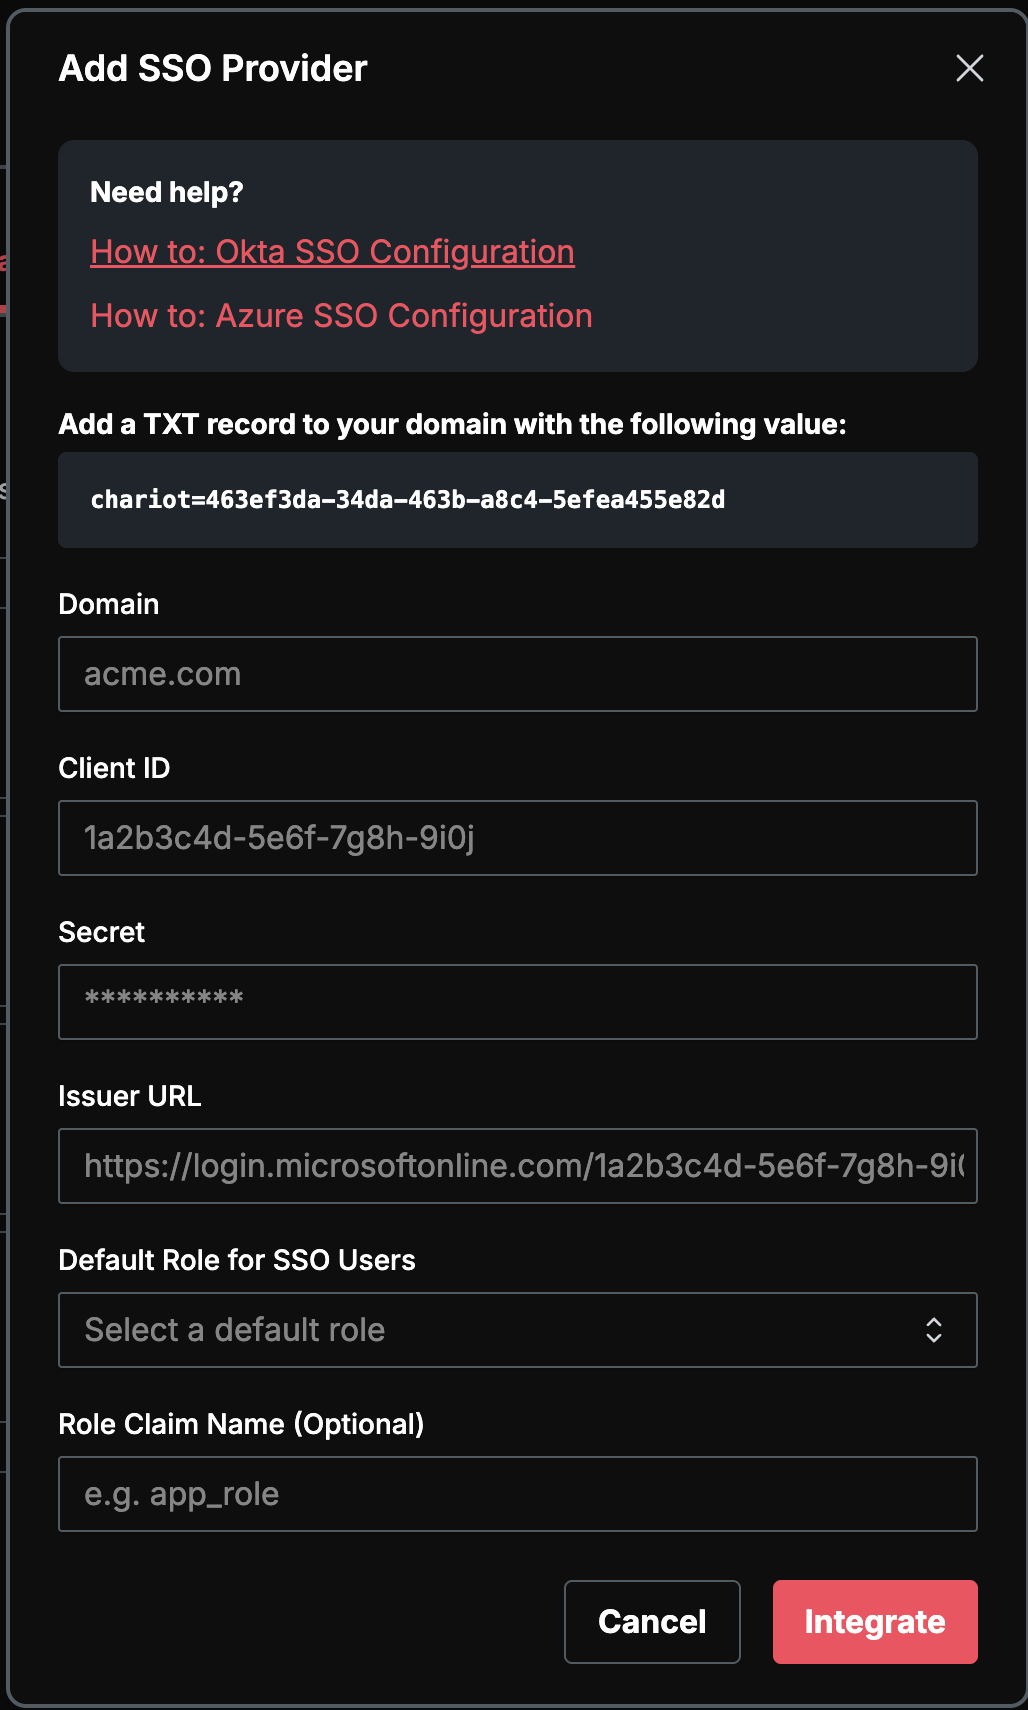
The domain field should be your email domain (for example, "praetorian.com" if your email is "john.doe@praetorian.com"). The Client ID is your Azure Application (client) ID, and the Client Secret is the value you generated in the Certificates and Secrets section. For the Issuer URL, use the formatted URL containing your tenant ID as described above.
Managing Access Permissions
Access to your PGP account will be granted to users based on the account group specified in your Azure tenant. For detailed information about configuring these access permissions, consult the Azure Documentation.
User Provisioning and Role Assignment
Once SSO is configured, all users are managed through your Entra tenant. New users do not need to be provisioned in PGP ahead of time — an account is created automatically the first time an Entra user signs in.
During SSO setup, choose how roles are assigned:
Default role — Every SSO user is granted the same role on first sign-in. After sign-in, the role for an individual user can be adjusted under Settings > User Management. We recommend setting the Default Role to Read Only so any user whose role claim is missing or invalid lands in the least-privileged state.
Role claim — Map an Entra role claim to PGP's three roles: Read Only, Analyst, and Admin. For Entra, the supported source is Entra App Roles defined on the Guard SSO application registration.
When configuring a role claim, the following details apply:
Source — Use Entra App Roles, not Entra groups, raw user attributes, or other custom sources.
Token type — PGP enforces RBAC from the ID token only. Access-token claims are not inspected.
Claim format — The value PGP reads must be a single string. Entra's built-in
rolesclaim is emitted as an array and will be silently ignored. Use a claims-mapping policy or token transformation to emit the user's assigned App Role as a single-string custom claim (for example,app_role).Claim name — Pick any name you like for that custom claim and enter the same value in PGP as the Role Claim Name. PGP maps it internally to its
custom:guard_roleclaim.Accepted values — Each App Role's Value must be exactly
admin,analyst, orreadonly(lowercase, case-sensitive). Any other value is logged as invalid and falls back to the Default Role.Mapping location — Role mapping is configured exclusively in Entra. PGP exposes only the Role Claim Name and Default Role fields — there is no separate role-mapping UI inside PGP.
Each user should be assigned to exactly one of the Guard App Roles; multiple assignments will produce a multi-valued roles claim that PGP cannot resolve.
For step-by-step instructions (defining App Roles, assigning users, and emitting the single-string custom claim), see Role-Based Access Controls (RBAC).
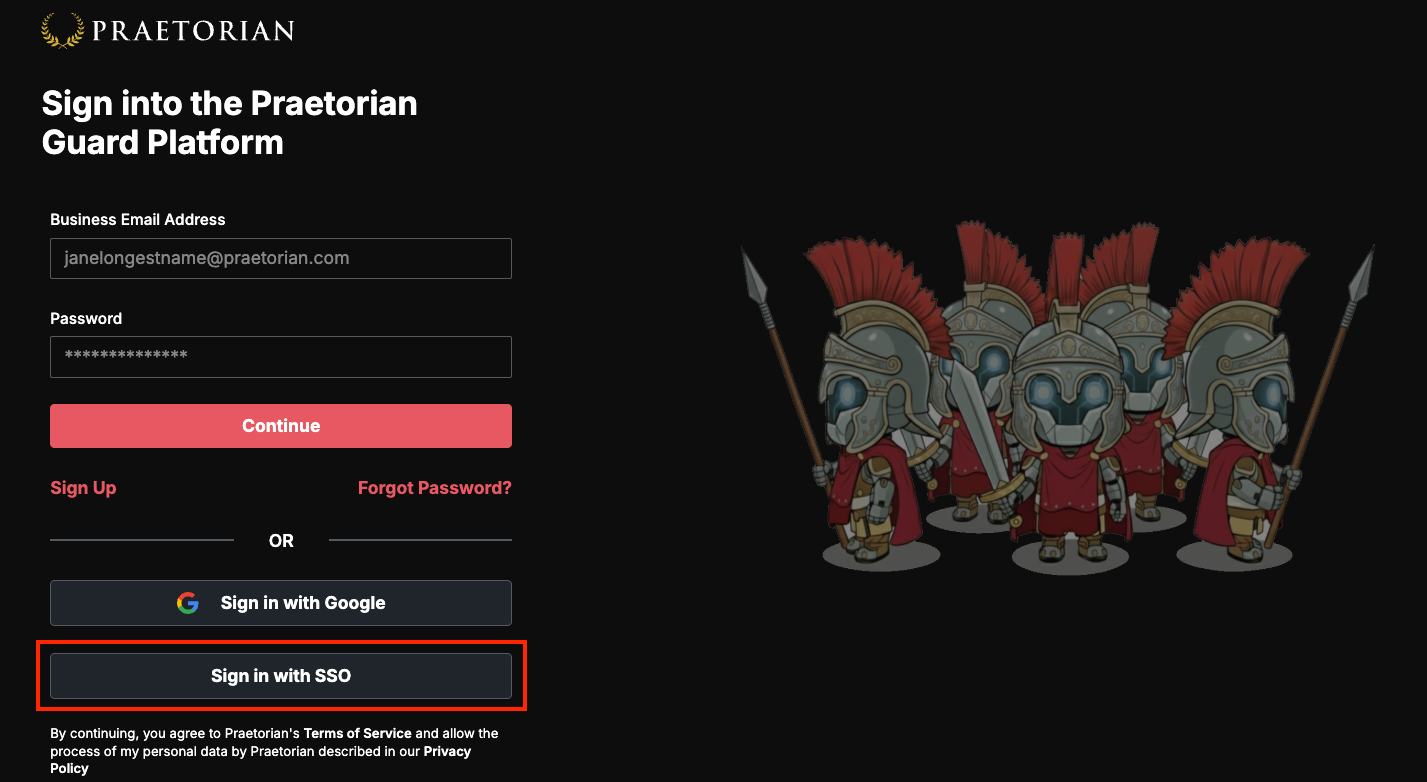
Once the setup is complete, users can access PGP through the “Sign in with SSO” portal on the login page.
It's worth noting that while you can remove the DNS TXT record after completing the SSO setup, you'll need to temporarily reinstate it if you make any changes to the SSO configuration, such as rotating secrets.
Should you encounter any difficulties during this process or need assistance, don't hesitate to reach out to support@praetorian.com for help. Our support team is ready to assist you in ensuring a smooth integration between Azure and PGP.