Role-Based Access Controls (RBAC)
Role-Based Access Controls (RBAC)
The Praetorian Guard Platform uses Role-Based Access Controls (RBAC) to manage what users can see and do within the platform. This article explains the available roles, their permissions, and how to configure role assignments for both direct users and SSO users.
Roles Overview
Guard has three built-in roles, arranged from most to least permissive:
Permissions by Role
How Roles Work
Home account: Every user is automatically an Admin on their own account.
Collaborating accounts: When a user is invited to collaborate on another account, they are assigned a specific role (Admin, Analyst, or Read Only) by that account's admin.
Role ceiling: API keys and SSO configurations can set a maximum role level. Even if a user would normally have Admin access, a role ceiling limits them to the configured maximum.
Managing User Roles in Guard
To view and change user roles:
Log in to Guard at https://guard.praetorian.com
Navigate to Settings (gear icon in the left sidebar)
Select the User Management tab
You will see two sections:
Authorized Users — Users who have access to your account, with their assigned roles
Collaborating With — Other accounts you have access to
To invite a new user
Click the Add User button
Enter the user's email address
Select a role from the dropdown: Admin, Analyst, or Read Only
Click Invite
To change an existing user's role
Find the user in the Authorized Users table
Click the role dropdown next to their name
Select the new role
The change takes effect immediately
To remove a user
Find the user in the Authorized Users table
Click the Remove button next to their name
Note: Only users with the Admin role can add, remove, or change roles for other users. If you don't see these options, contact your account administrator.
SSO Role Configuration
For organizations using Single Sign-On (SSO), user roles can be managed through your identity provider. Guard supports role mapping from both Azure AD (Entra ID) and Okta via OIDC.
When SSO is configured with RBAC enabled, you configure two things in Guard:
Default Role — The role assigned to SSO users when no role claim is present (e.g., Read Only)
Role Claim Name — The name of the claim in your SSO token that contains the user's Guard role. You may use any claim name you wish (e.g.,
app_role); Guard maps whatever name you provide to its internalcustom:guard_roleclaim during SSO setup.
The role claim value must be exactly one of: admin, analyst, or readonly (lowercase, case-sensitive). The role from the SSO token acts as the user's role ceiling — they cannot exceed the role granted by their identity provider.
How Guard Reads the Role Claim
The following details apply to every SSO provider Guard supports:
Token type — Guard enforces RBAC using the ID token only. The access token is not inspected for role information.
Internal claim — Whatever Role Claim Name you choose on your side is mapped to
custom:guard_roleinside Guard. Role mapping is configured exclusively on the customer side via your IdP — there is no separate role-mapping UI in Guard beyond the Default Role and Role Claim Name fields.Claim format — The claim value must be a single string (e.g.,
"analyst"). Array-valued claims (e.g.,["analyst"]) are silently ignored, even if the array contains an otherwise valid value. If your IdP issues an array by default (such as the Entrarolesclaim), make sure it is flattened to a single string before being passed to Guard.Accepted values — Exactly
admin,analyst, orreadonly. Anything else (different casing, extra whitespace, custom labels) is logged as an invalid SSO role claim and treated as missing.Fallback behavior — Guard resolves the effective role in this order:
If
custom:guard_roleis missing, Guard uses the SSO account's configured Default Role.If
custom:guard_roleis present but invalid, the value is logged, ignored, and Guard falls back to the configured Default Role.If neither yields a valid role, no role ceiling is applied and the effective role resolves to Read Only.
For this reason, we recommend setting the Default Role to Read Only so unmapped or misconfigured users land in the least-privileged state.
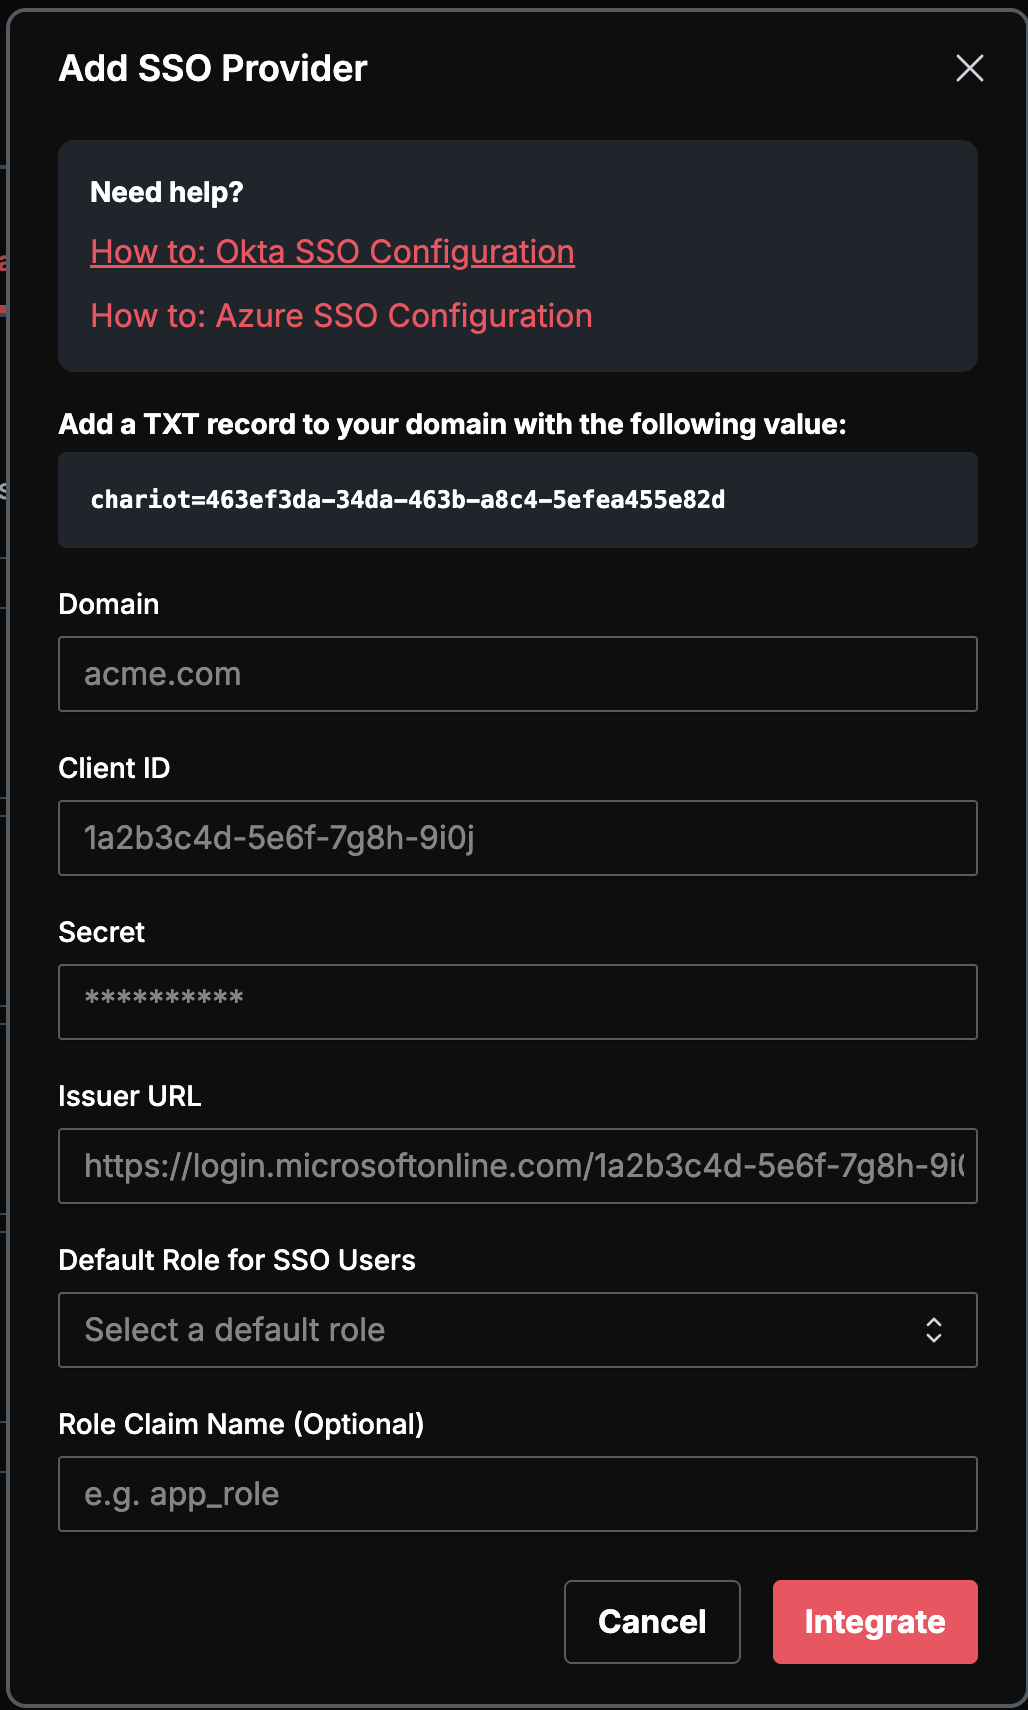
To configure SSO with RBAC in Guard
Go to Settings > Organization > SSO Providers
Click Add SSO Provider
Fill in your provider details (Domain, Client ID, Client Secret, Issuer URL)
Set the Default Role for SSO Users (this applies when no role claim is present)
Optionally enter the Role Claim Name — the token claim that contains the Guard role
Click Save
Azure AD (Entra ID) Setup
For Entra ID, Guard expects roles to be sourced from Entra App Roles defined on the application registration used for Guard SSO. App Roles are the supported integration point — Entra groups, raw user attributes, and other custom claim sources are not recommended.
The built-in Entra roles claim is emitted as an array, which Guard silently ignores. You must therefore project the user's App Role into a single-string custom claim via a claims mapping policy, and use that custom claim as the Role Claim Name in Guard.
Step 1: Define App Roles on the Application
Sign in to the Microsoft Entra admin center.
Navigate to Entra ID > App registrations and select the application you registered for Guard SSO.
Under Manage, select App roles > Create app role.
Create one App Role for each Guard role you want to grant. Each role's Value must be exactly one of:
admin,analyst, orreadonly(lowercase, case-sensitive). The display name can be anything you prefer (for example, "Guard Admin"). Set Allowed member types to Users/Groups.Save each App Role.
Step 2: Assign Users and Groups to the App Roles
From your app registration's Overview, open the linked Enterprise application.
Under Manage, select Users and groups > Add user/group.
Select the users or groups, then under Select a role pick the App Role that should grant the desired Guard role.
Each user should end up assigned to exactly one of your Guard App Roles. If a user is assigned to more than one, the resulting
rolesclaim will contain multiple values and Guard will not be able to resolve a single role.
Step 3: Emit the Role as a Single-String Custom Claim
Because Guard ignores array-valued claims, you cannot use the default roles claim directly. Instead, emit a single-string custom claim derived from the user's App Role assignment.
In your app registration's Overview page, under Managed application in local directory, click the link to your enterprise application.
Under Manage, select Single sign-on (or, for OIDC apps, configure Token configuration on the app registration).
In the Attributes & Claims (SAML) or Token configuration (OIDC) section, add a new claim:
Name — Any name you choose (for example,
app_role). This is the value you will enter as the Role Claim Name in Guard.Source — Attribute, set to
user.assignedroles(or use a transformation that emits the first/only element of the assigned roles as a string).Ensure the output is a single string, not an array. If your tenant only emits the value as an array, configure a claims-mapping policy or transformation that returns the single assigned role string.
Save the claim.
Step 4: Update the Application Manifest
Return to App registrations and select your application.
Under Manage, select Manifest.
Set
acceptMappedClaimstotrue.Save the manifest.
Step 5: Enter the Claim Name in Guard
In Guard, set Role Claim Name to the name you used in Step 3 (for example, app_role). Guard will read that claim from the ID token, validate the value against admin/analyst/readonly, and map it to the user's effective Guard role.
Okta Setup
To send Guard roles from Okta, you need to add a custom claim to the tokens issued by your Okta authorization server. This claim will map to the Role Claim Name you configured in Guard.
Two requirements apply to both options below:
Include in token type must be set to ID Token. Guard does not read role information from the access token.
The claim must resolve to a single string equal to
admin,analyst, orreadonly(lowercase). Any other value, or an array-valued claim, is treated as missing and falls back to the Default Role.
Option A: Using a Custom Claim with User Profile Attribute
In the Okta Admin Console, go to Security > API
Select the Authorization Servers tab
Choose your authorization server (e.g., default)
Go to the Claims tab and click Add Claim
Configure the claim:
Name: Must match the Role Claim Name you configured in Guard (e.g., app_role)
Include in token type: Select ID Token
Value type: Select Expression
Value: Enter an Okta Expression Language expression that resolves to the user's Guard role, such as user.guardRole (a custom profile attribute you define)
Include in: Leave as Any scope or specify openid
- Click Create
Then set the custom profile attribute value (admin, analyst, or readonly) on each user in Okta.
Option B: Using Group Membership to Determine Roles
If you prefer to manage roles via Okta groups:
Create groups in Okta for each Guard role (e.g., guard-admin, guard-analyst, guard-readonly)
Assign users to the appropriate group
In the Okta Admin Console, go to Security > API > Authorization Servers
Select your authorization server and go to the Claims tab
Click Add Claim:
Name: Must match the Role Claim Name in Guard (e.g., app_role)
Include in token type: Select ID Token
Value type: Select Expression
Value: Use an expression that maps group membership to a role string, for example: isMemberOfGroupName(guard-admin) ? admin : (isMemberOfGroupName(guard-analyst) ? analyst : readonly)
Include in: Any scope
- Click Create
Verification
After configuring either option, test the setup by:
Logging in to Guard via SSO
Confirming the assigned role matches the expected value from your identity provider
Frequently Asked Questions
Q: What role does a new user get by default?A: When invited directly, the admin selects the role. For SSO users, the Default Role configured on the SSO provider is used when no role claim is present.
Q: Can I create custom roles?A: Not at this time. Guard uses three predefined roles (Admin, Analyst, Read Only). Custom roles may be supported in the future.
Q: Why can't I change settings or add integrations?A: These actions require the Admin role. Contact your account administrator to request an upgrade.
Q: I'm an SSO user — how do I change my role?A: SSO user roles are managed through your identity provider (Azure AD or Okta). Contact your IT administrator to change your role assignment.
Q: Can I have different roles on different accounts?A: Yes. You are always an Admin on your home account, but you may have different roles on accounts you collaborate with.
Q: What happens if the role claim value doesn't match admin, analyst, or readonly?A: Guard logs the value as an invalid SSO role claim, ignores it, and falls back to the Default Role configured on the SSO provider. Matching is lowercase and case-sensitive — Admin, ADMIN, or read-only will all be treated as invalid.
Q: What token does Guard read the role claim from — ID token or access token?A: ID token only. Guard does not inspect the access token for role information.
Q: My IdP issues the role as an array (for example, ["analyst"]). Will Guard accept it?A: No. Guard requires a single string value. Array-valued claims are silently ignored, even when the array contains a valid value. Use a claims-mapping policy or transformation in your IdP to emit the role as a single string.
Q: Is there a role-mapping UI inside Guard?A: No. Role mapping is configured exclusively on the customer side in your IdP. Guard's only related settings are the Role Claim Name (the name of your claim) and the Default Role (used when no valid role claim is present).