Google Cloud Platform - Manual Deployment
Google Cloud Platform - Manual Deployment
This section covers the manual deployment process for integrating Google Cloud Platform with the Praetorian Guard Platform (PGP). While this method provides complete control over each step, we recommend using the Terraform/IaC approach for better consistency and maintainability. Manual deployment requires creating several GCP resources through the Google Cloud Console, with separate processes for organization-level and project-level integrations.
Important: Manual deployment is more complex and error-prone than the automated Terraform method. Consider using the IaC approach unless you have specific requirements that necessitate manual configuration.
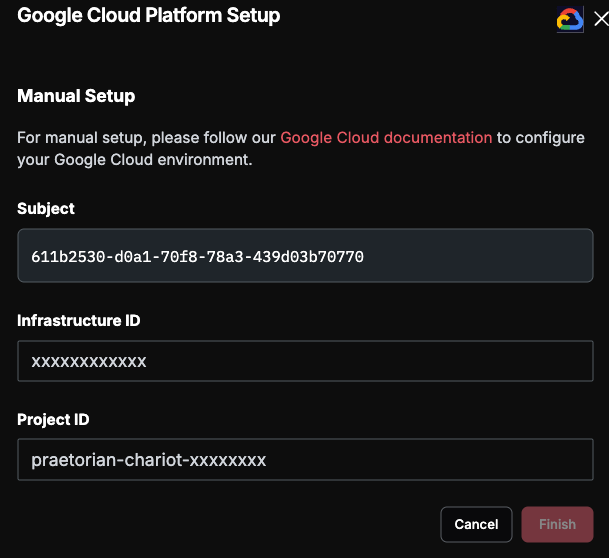
The initial process is the same as the IaC deployment. When you select Manual as the deployment type, the PGP UI will provide you with a Subject value unique to your environment. Make a note of this value before proceeding with the resource creation steps below.
Organization-Level Integration
Step 1: Create Integration Project
Go to the GCP Console
Click the project dropdown and select "New Project"
Set project name: Praetorian PGP Integration
Set project ID: praetorian-PGP-integration
Link a billing account to the project as needed (note: the required resources do not incur any cost, but a billing account is necessary to enable required APIs within GCP)
Step 2: Enable Required APIs
Navigate to "APIs & Services" > "Library"
Ensure the following APIs are enabled:
Identity and Access Management (IAM) API
Security Token Service API
Cloud Resource Manager API
Step 3: Create Service Account
Navigate to "IAM & Admin" > "Service Accounts"
Click "Create Service Account"
Set service account details:
Service account name: praetorian-chariot
Service account ID: praetorian-chariot
Description: Service account for Praetorian Guard Integration
Click "Create and Continue"
Follow the prompts to deploy the service account without adding permissions
Note: the specific values that reference “chariot”, the previous application name, are required for the service account name and ID.
Step 4: Grant Organization-Level Permissions
Navigate to "IAM & Admin" > "IAM"
Change scope to your organization (click project dropdown > select organization)
Click "Grant Access"
Add the service account email: praetorian-PGP@praetorian-PGP-integration.iam.gserviceaccount.com
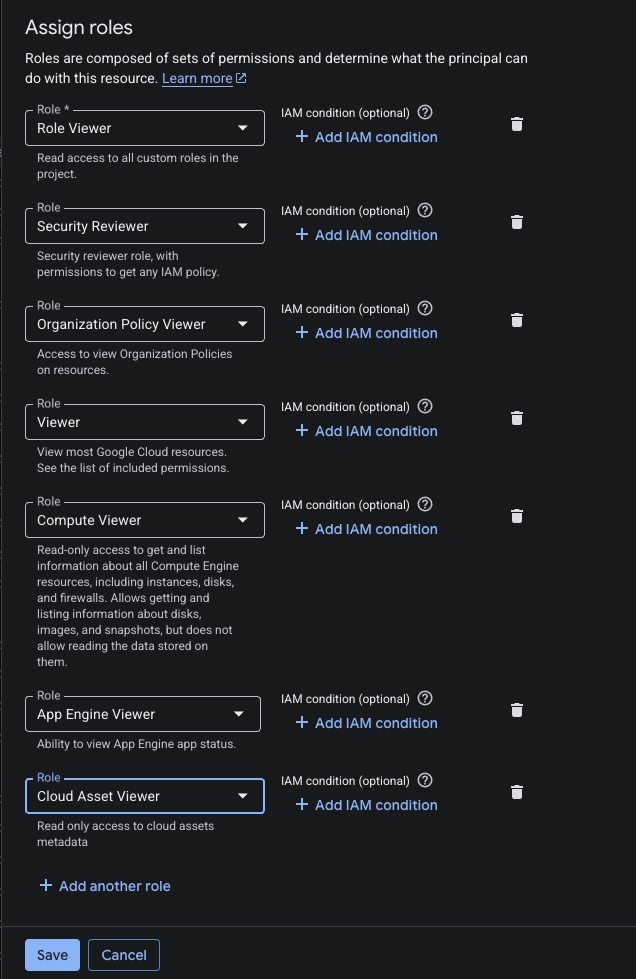
Assign the following roles:
Viewer
Organization Policy Viewer
Role Viewer
Security Reviewer
Compute Viewer
App Engine Viewer
Cloud Asset Viewer
The "Assign Roles" pane should look like shown below:
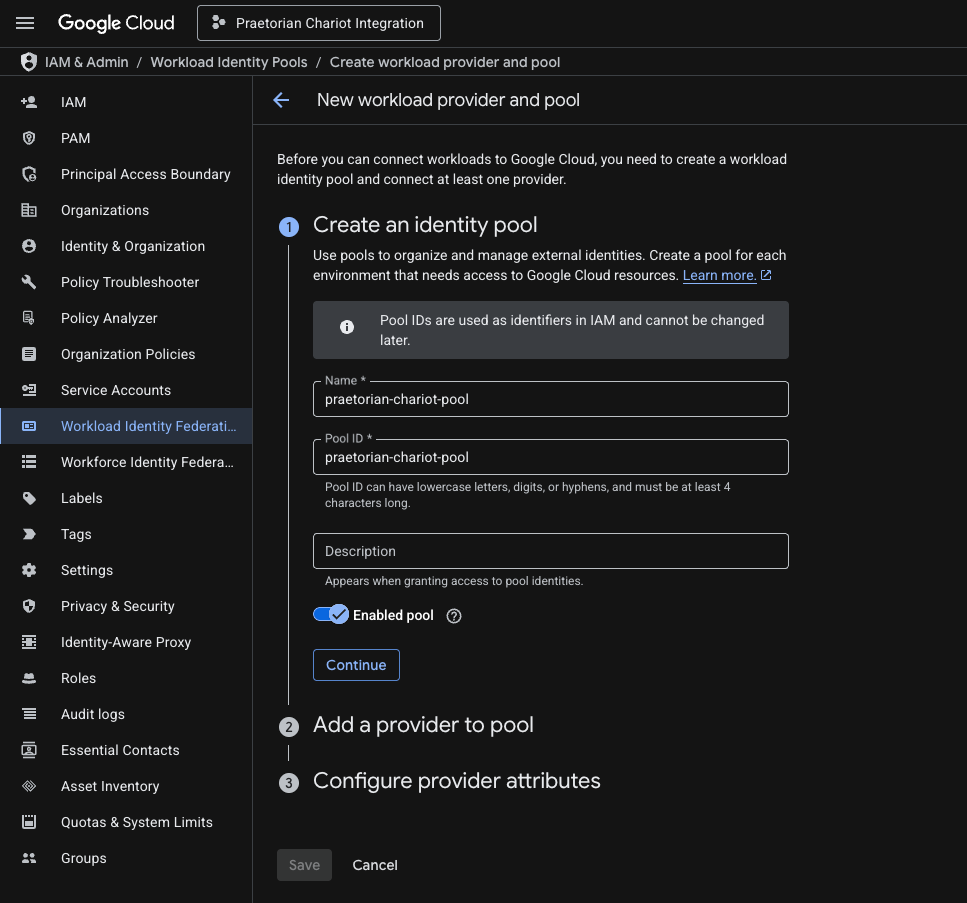
Step 5: Create Workload Identity Pool
Navigate to "IAM & Admin" > "Workload Identity Federation"
Click "Create Pool"
Set pool details:
Pool name: praetorian-chariot-pool
Pool ID: praetorian-chariot-pool
Description: Workload identity pool for Praetorian PGP Integration
Click "Continue"
Step 6: Create Workload Identity Provider
In the pool creation flow, click "Add Provider"
Select provider type: "OpenID Connect (OIDC)"
Set provider details:
Provider name: praetorian-chariot-provider
Provider ID: praetorian-chariot-provider
Issuer URL: https://cognito-idp.us-east-2.amazonaws.com/us-east-2_zwCio82YL
Allowed audiences: 5p3de4lul8h97k3fmk72spesch
At this stage, your provider should look like the following screenshot

For the next step, configure attribute mapping:
google.subject: assertion.sub
Set attribute condition: google.subject=="YOUR-UNIQUE-USERNAME" (this is the Subject value PGP provided you in Step 1)
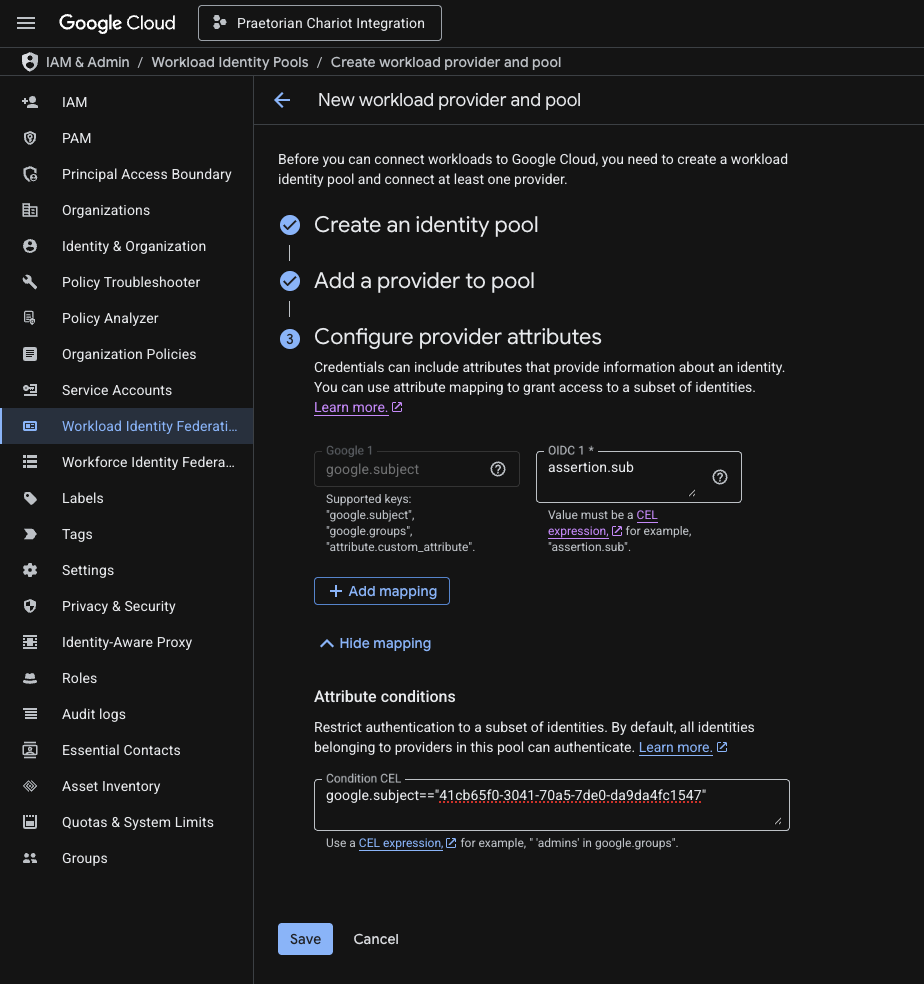
Make sure that the condition is set appropriately, as this is a requirement to prevent confused deputy attacks
Click "Save"
Step 7: Configure Service Account Impersonation
Visit your newly created pool and make note of your pool's IAM Principal
Go to "IAM & Admin" > "Service Accounts"
Click on the praetorian-PGP service account
Go to the "Permissions" tab
Click "Grant Access"
Add the principal noted earlier: principal://iam.googleapis.com/projects/PROJECT-NUMBER/locations/global/workloadIdentityPools/praetorian-PGP-pool/subject/SUBJECT_ATTRIBUTE_VALUE (ensure the project-number and subject attribute value are correct per your deployment)
Make a note of the PROJECT_NUMBER in the principal string, this is the value for the Infrastructure ID that you will provide back to PGP to verify the deployment
Assign role: "Workload Identity User"
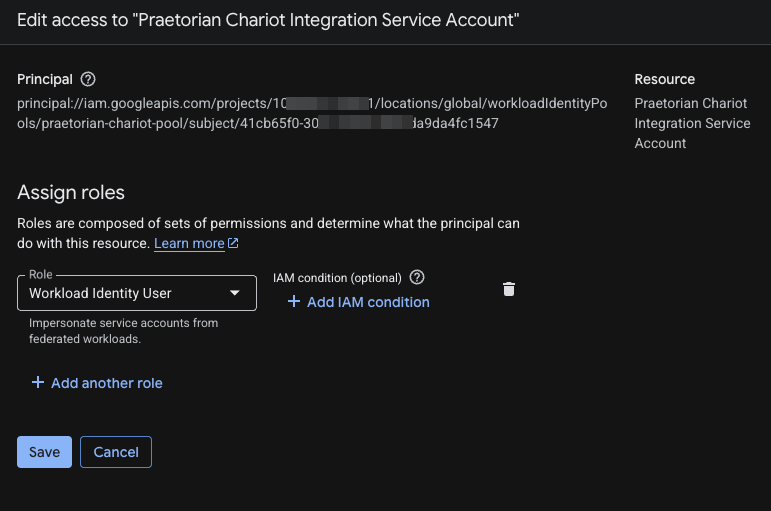
Click "Save"
Step 8: Complete Integration
Retrieve the Project Number value for the project where the workload identity pool is deployed. Most simply, this value is present within the Principal Name for the workload identity pool.
Project-Level Integration
If you selected an organization-level integration, all your projects should automatically be integrated. Follow these steps only if you wish to integrate individual projects.
Step 1: Create Service Account
Navigate to your target project in the GCP Console
Go to "IAM & Admin" > "Service Accounts"
Click "Create Service Account"
Set service account details:
Service account name: praetorian-PGP
Service account ID: praetorian-PGP
Description: Service account for Praetorian PGP Integration
Click "Create and Continue"
Step 2: Grant Project-Level Permissions
Navigate to "IAM & Admin" > "IAM"
Set the scope to your project
In the service account creation flow, assign project roles:
Viewer
Security Reviewer
Compute Viewer
App Engine Viewer
Cloud Asset Viewer
Click "Continue" and then "Done"
Step 3: Grant Organization-Level Permissions
Navigate to "IAM & Admin" > "IAM"
Change scope to your organization
Click "Grant Access"
Add the service account email
Assign the following roles:
Organization Policy Viewer
Organization Role Viewer
Create and assign a custom role with permissions:
resourcemanager.folders.get
resourcemanager.folders.getIamPolicy
resourcemanager.folders.list
Step 4: Create Workload Identity Pool
Follow the same steps as organization-level integration (Steps 5-7), but create the pool within your target project instead of the dedicated integration project.
Completing Your Manual Integration
After completing all manual deployment steps, return to the PGP integration modal and enter the Project Number (Infrastructure ID) you noted during the service account impersonation configuration. Click "Finish" to complete the integration process.
PGP will validate the integration by performing OIDC token exchange with your Workload Identity Provider and testing the configured permissions. Once validated, your GCP integration will appear in your integrations list and begin monitoring your GCP environment.
Need Help?
If you encounter any issues during the manual deployment process or have questions about the integration setup, please contact our support team at support@praetorian.com. Include your Project Number (Infrastructure ID) and any error messages you've encountered to help us assist you more effectively.