Vulnerabilities
How to triage, track, and resolve security vulnerabilities Guard discovers across your attack surface.
A vulnerability is a security weakness Guard found on one of your assets, such as a misconfiguration, an exposed credential, an unpatched CVE, or a weak TLS setup. Use the Vulnerabilities page to triage, track, and resolve them.
Statuses
Rejected findings are hidden from the table, so the Status filter offers Detected, Demonstrated, Resolved, and Accepted.
Typical paths:
- Detected → Demonstrated → Resolved
- Detected → Rejected
- Detected → Demonstrated → Accepted
Detected findings expire
A Detected finding expires after 30 days unless a scan sees it again, which restarts the 30 days. When the finding moves out of Detected, it no longer expires.
Resolved findings reopen
If a scan sees a Resolved finding again, Guard sets it back to Demonstrated.
Severities
Critical, High, Medium, Low, Info, and Exposure. Exposure findings describe something that enlarges your attack surface, such as an open service, without being a directly exploitable flaw.
The Vulnerabilities table
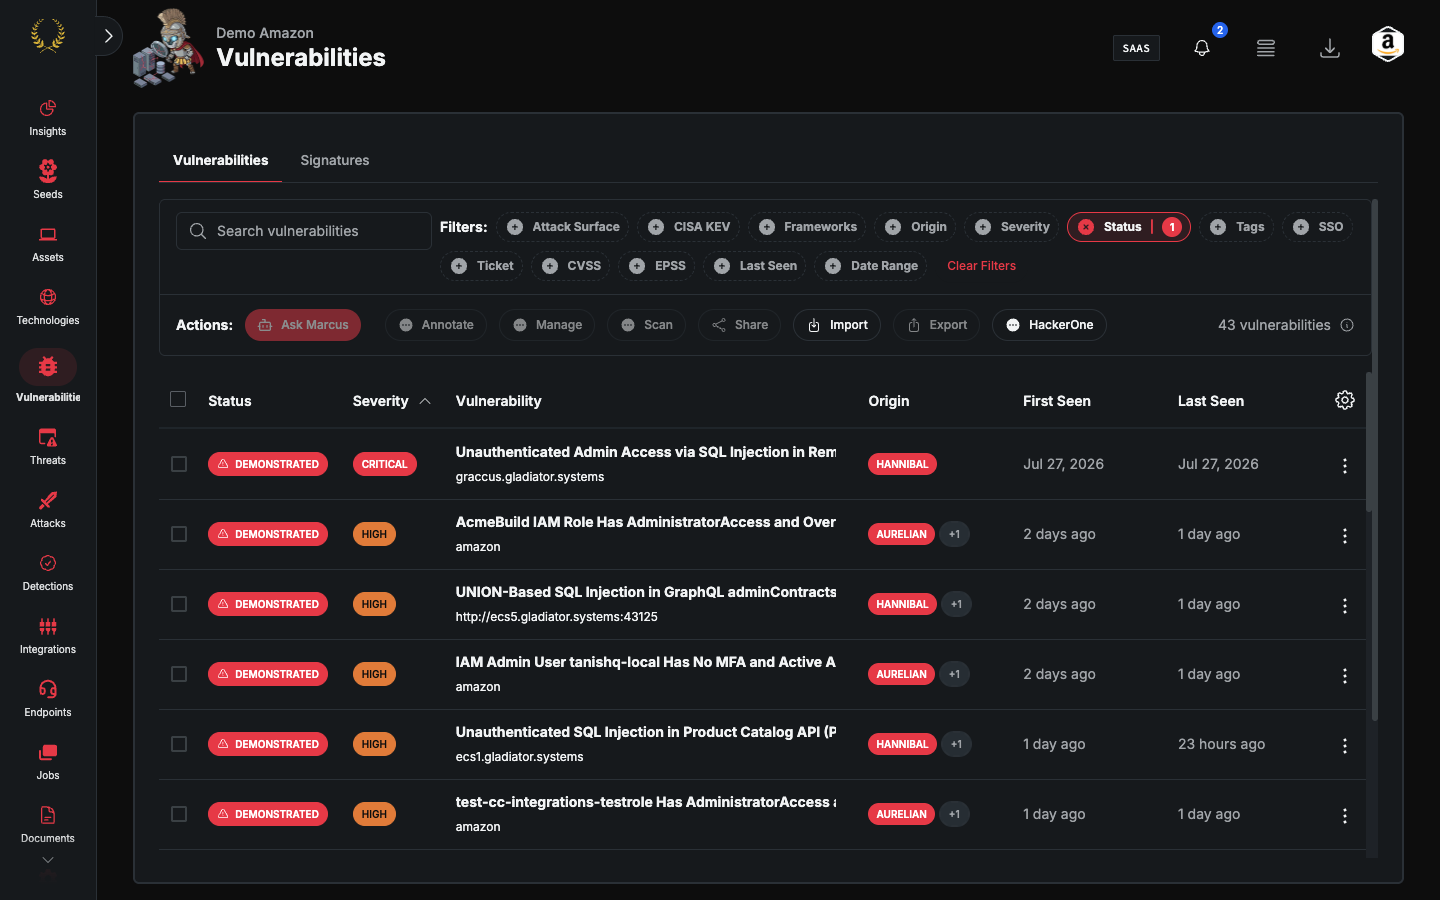
Columns
Shown by default: Status, Severity, Vulnerability, Tags, Origin, First Seen, and Last Seen. The Vulnerability column cannot be hidden.
Available from the column picker: CVE, CVSS, EPSS, CISA KEV, Ticket, Frameworks, Attack Surface, Demonstrated, and ID.
- Origin is the scanner or integration that reported the finding.
- Ticket shows the linked ticket's provider icon and ID. Click the ID to open the ticket in your ticketing system.
- ID is the finding's unique identifier in Guard.
Search and filters
Type in Search vulnerabilities to find findings by name.
The filter bar offers:
- Attack Surface: Application, Cloud, External, Internal, LLM, Mobile, Repository
- CISA KEV: Yes or No
- Frameworks: OWASP Top 10 2021, OWASP LLM Top 10, MITRE ATT&CK, MITRE ATLAS, MITRE D3FEND, NIST CSF 2.0, PCI DSS 4.0, HIPAA, SOC 2, CIS Controls v8
- Origin
- Severity
- Status
- Tags
- SSO: Yes or No
- Ticket: Has Ticket or No Ticket
- CVSS range (0–10) and EPSS range (0–1)
- Last Seen: 24 Hours, 48 Hours, 7 Days, 2 Weeks, or 30 Days
- Date Range
A filter can be negated to exclude the values you pick. Click Clear Filters to reset them all.
To filter by CVE, use the Query Builder (below).
Acting on findings
If you have permission to edit findings, select one or more rows to show the action bar:
- Ask Marcus: ask Marcus about the selected findings.
- Retest: retest the selected findings.
- Annotate: Add Note, Add Tag, or Remove Tag.
- Manage: change status or severity. In the drawer, Manage also has Edit Verification.
- Scan: Rescan Affected Assets. For findings from a Marcus hunt, this is Rescan with Marcus.
- Share, Import, Export, and Ticketing.
Each row also has a menu with Change Severity and Change Status. Choosing Rejected asks you for a reason.
Every status change is recorded in the finding's history.
When there are no findings yet
The Get Started with Vulnerabilities prompt offers three options:
- Auto Discover: add seeds so Guard discovers and scans your attack surface.
- Configure Integrations: connect Nessus, Rapid7, Qualys, Burp, or Invicti.
- Import Vulnerabilities: upload results from Qualys, Nessus, InsightVM, or NSA CSaaS.
The detail drawer
Click a row to open the drawer. The header shows the name, ID, severity, status, and First Seen and Last Seen dates, along with actions for the finding.
The drawer has these tabs:
- Details: the proof of the finding, organized in a left-hand menu (see below). If there is more than one piece of evidence, pick one from the selector. For CVE findings with enrichment data, Details also has Risk Score (CVSS and EPSS), Exploitation Activities (exploitation timeline and threat actors), and MITRE sub-tabs.
- Assets Impacted: every asset that has this finding.
- History: every change, with who made it and when.
- Notes: notes from your team. You can add, edit, and delete notes.
- HackerOne: appears only when the finding has a HackerOne report.
The Details menu
Every finding shows these five stages in the Details menu. A stage with nothing recorded yet shows an empty state, such as Not yet exploited or Not yet remediated.
- Overview: the finding writeup and context, followed by External Links, Frameworks, and SSVC.
- Detection: how the finding was detected and matched.
- Verification: validation notes and analysis. To record your own, choose Manage → Edit Verification in the drawer header, write your notes, and click Save.
- Exploitation: exploitation activity for the finding, including live agent progress.
- Remediation: steps to fix or mitigate the finding, related tickets, and who resolved it and when.
Depending on the finding, the menu can also show Request (the raw request that triggered the detection), Response (the server response confirming it), Attributes (endpoints and other details attributed to the finding), and Images (screenshots and uploaded images).
Ticketing
Connect a ticketing integration to link findings to tickets. The integration's own article explains its setup and sync behavior.
Once findings are linked, the Ticket column and filter work together to show what is already tracked. For example, filter for Demonstrated, Critical, and No Ticket to see urgent findings that have not reached your remediation queue.
Query Builder
In a Vulnerability query, the CVE field supports is and is not. Enter a full CVE ID, for example CVE-2024-1234. Save the query as a view to track a CVE over time.
Still need help? Ask the team